Simple holiday nails are proof that a beautiful festive manicure does not need complicated artwork, oversized decorations, or hours of meticulous painting. Sometimes, the most sophisticated holiday nail designs are also the easiest to recreate. A delicate champagne-gold accent, an elegant cranberry French tip, or a whisper of pearlescent shimmer can transform an everyday manicure into something that feels luxurious, festive, and effortlessly stylish.
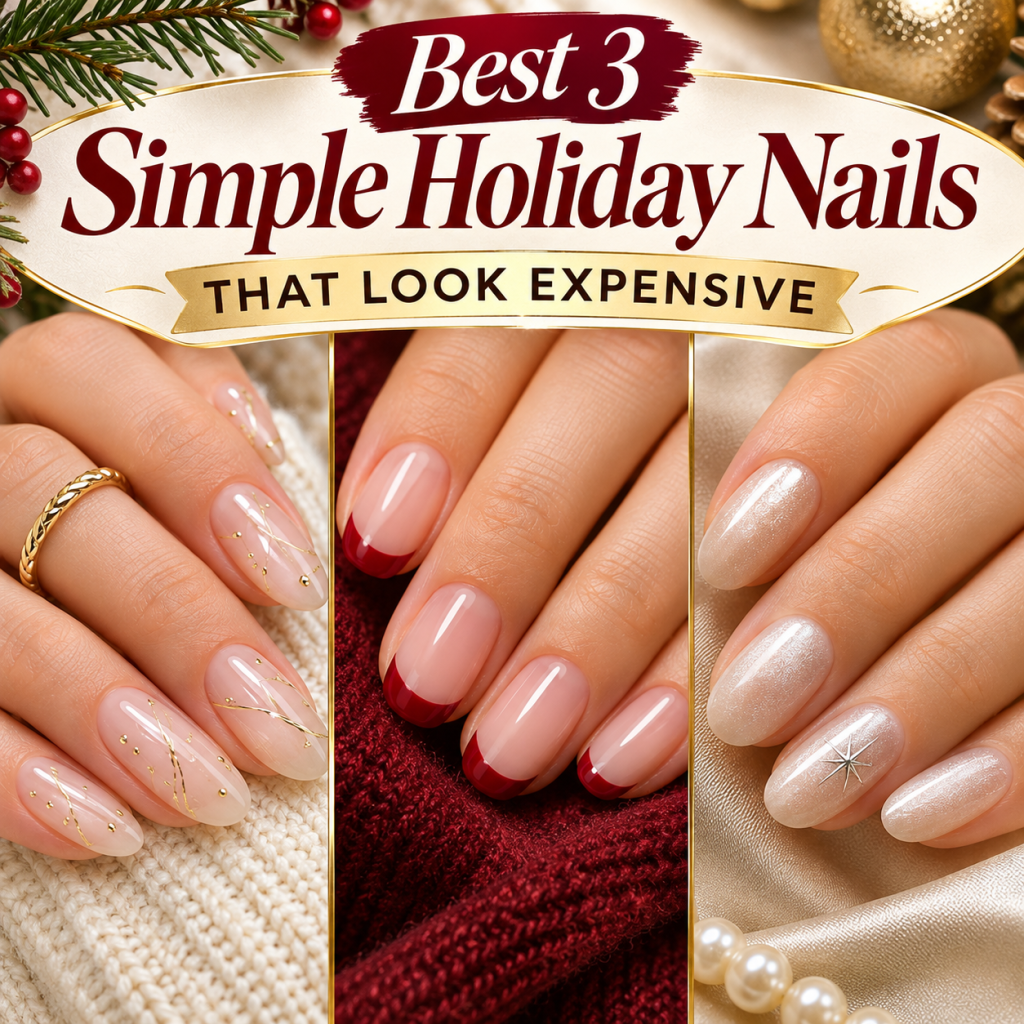
As the holiday season approaches, finding nail designs that look polished without requiring professional-level skills becomes especially appealing. Between Christmas gatherings, cozy winter evenings, family celebrations, and glamorous New Year’s Eve parties, a versatile manicure can complement several occasions without needing to be changed every few days.
The secret is choosing a design that makes a strong visual impression through thoughtful details rather than elaborate decoration.
Instead of covering every nail with snowflakes, glitter, ornaments, and holiday illustrations, contemporary minimalist manicures focus on beautiful finishes, flattering shapes, balanced color combinations, and carefully placed accents.
The result can look surprisingly expensive.
Even better, many of these designs work beautifully on short natural nails, making them practical for anyone who prefers comfortable, low-maintenance manicures.
From understated luxury to playful seasonal elegance, the following three nail designs offer distinctive ways to celebrate the holidays while maintaining a sophisticated appearance.
Each idea can be adapted to different nail lengths, skin tones, personal styles, and festive occasions.
Whether you love neutral nails, rich seasonal colors, or delicate shimmer, these three simple holiday nails can deliver the perfect balance between effortless beauty and festive glamour.
🥇 Best 1 Simple Holiday Nails With Minimalist Champagne Gold Accents
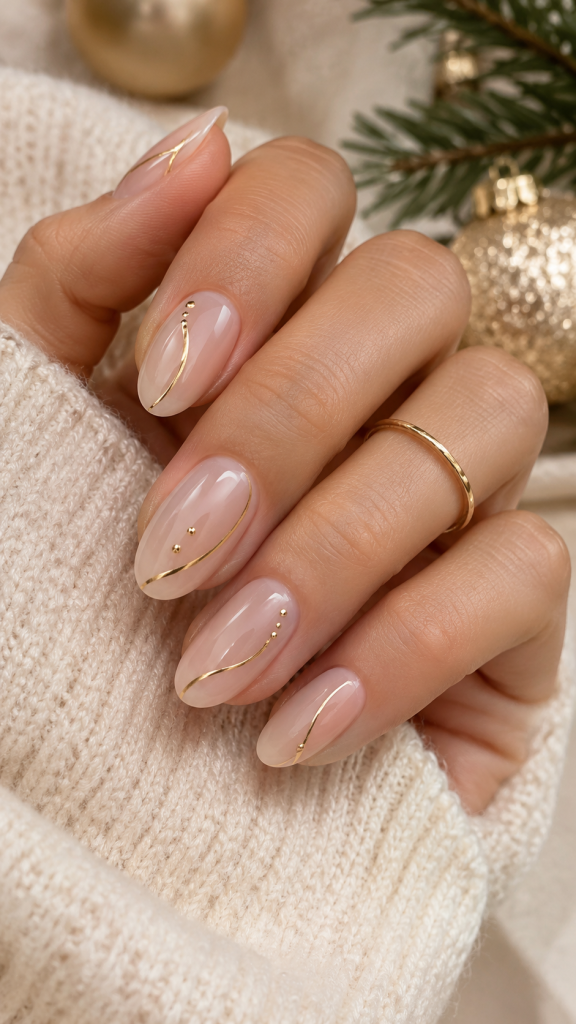
Champagne-gold accents are an especially elegant choice for creating a holiday manicure that feels sophisticated without looking overly decorated.
This design combines a delicate nude base with carefully placed metallic details, allowing each nail to appear clean, luminous, and beautifully finished.
The overall effect resembles understated luxury jewelry.
Rather than demanding attention through bold colors or complicated patterns, champagne-gold nail art creates visual interest through gentle reflections and precise placement.
It is the kind of manicure that looks equally beautiful beside a cream cashmere sweater, a satin evening dress, or a tailored winter outfit.
Why Champagne Gold Makes Simple Holiday Nails Look Luxurious
Gold has long been associated with celebration, warmth, and elegance.
However, the shade and finish of the metallic polish significantly influence the overall result.
Bright yellow gold can create a dramatic statement, while muted champagne gold offers a softer and more refined appearance.
Its gentle metallic undertones pair particularly well with sheer nude, milky beige, blush pink, and translucent ivory.
These combinations allow the manicure to capture the festive spirit without becoming visually overwhelming.
Champagne gold also transitions naturally between Christmas and New Year’s celebrations.
A subtle metallic accent feels appropriate for an intimate holiday dinner but still provides enough sparkle for a festive evening party.
The versatility makes this design appealing for anyone who wants one beautiful manicure that works throughout the holiday season.
Choose a Soft Neutral Base for an Expensive Looking Finish
The foundation of this manicure is a smooth, flattering neutral polish.
A sheer nude shade creates a delicate, almost natural appearance, while milky pink adds a slightly romantic touch.
For a warmer finish, a creamy beige or translucent peach nude can be particularly attractive.
The most important consideration is finding a shade that complements the natural undertones of your skin.
Cooler skin tones may prefer soft pink or rosy beige, while warmer skin tones can look beautiful with peach beige, honey nude, or creamy ivory.
Neutral skin tones often work comfortably with several options.
The polish should create a clean, even surface without looking unusually thick or opaque.
A translucent finish is especially effective because it allows a subtle sense of depth beneath the metallic accents.
Two thin coats often provide a more polished appearance than one heavy coat.
Allow each layer to dry according to the polish instructions before adding decorative details.
Add Tiny Gold Details That Feel Deliberate
The defining feature of this design is the placement of small champagne-gold accents.
Rather than painting large metallic sections, introduce subtle touches that complement the natural nail shape.
One attractive technique involves placing a tiny metallic dot near the cuticle of each nail.
Another option is drawing a delicate vertical line slightly away from the center of the nail.
This asymmetrical detail creates a modern appearance while visually emphasizing nail length.
For an even softer look, add a miniature gold crescent along the cuticle area of one or two accent nails.
The key is consistency.
When decorative details share similar proportions and placement, the manicure looks more intentional.
A thin nail art brush or dotting tool is useful for creating these effects.
However, beginners can also use a toothpick to place tiny dots, provided they work carefully and avoid applying excessive polish.
The Best Nail Shapes for Champagne Gold Accents
Short almond nails create a particularly elegant silhouette because their softly tapered edges complement delicate metallic lines.
However, the design is equally suitable for short oval, squoval, and rounded nails.
Shorter nails often benefit from smaller accents that leave plenty of negative space.
Longer nails can accommodate slightly extended lines or more elaborate cuticle detailing without appearing crowded.
For an understated manicure, avoid adding large metallic decorations to every finger.
A restrained design helps the reflective elements remain the focal point.
How to Recreate Champagne Gold Holiday Nails at Home
Begin by gently shaping the nails into your preferred silhouette.
Push back the cuticles carefully without cutting living skin, and clean away any remaining polish or surface oils.
Apply a suitable base coat to help create a smooth foundation.
Follow with one or two thin layers of sheer nude or milky pink polish.
Once the color has dried sufficiently, apply tiny gold accents using a detail brush or dotting tool.
For the most balanced appearance, begin with a single accent nail and evaluate how much decoration you want.
Allow the gold polish to dry before applying a glossy top coat.
A smooth, high-shine finish enhances the appearance of both the neutral background and metallic details.
Finish with cuticle oil after the manicure is dry.
Healthy-looking surrounding skin contributes significantly to the overall appearance of an elegant manicure.
Styling Champagne Gold Nails for Different Holiday Occasions
Champagne-gold manicures complement soft winter fabrics, delicate jewelry, and understated festive outfits.
For Christmas celebrations, pair the nails with ivory knitwear, warm beige clothing, or deep forest-green accessories.
For New Year’s Eve, combine them with satin, velvet, or a black evening outfit.
Gold jewelry can reinforce the metallic accents, but mixing them with silver accessories also works when the overall styling remains balanced.
The result feels refined rather than heavily coordinated.
Best for: Minimalist beauty lovers, short natural nails, elegant Christmas dinners, understated New Year’s Eve looks, and anyone who prefers versatile festive manicures.
🥈 Best 2 Simple Holiday Nails With Elegant Cranberry Micro French Tips
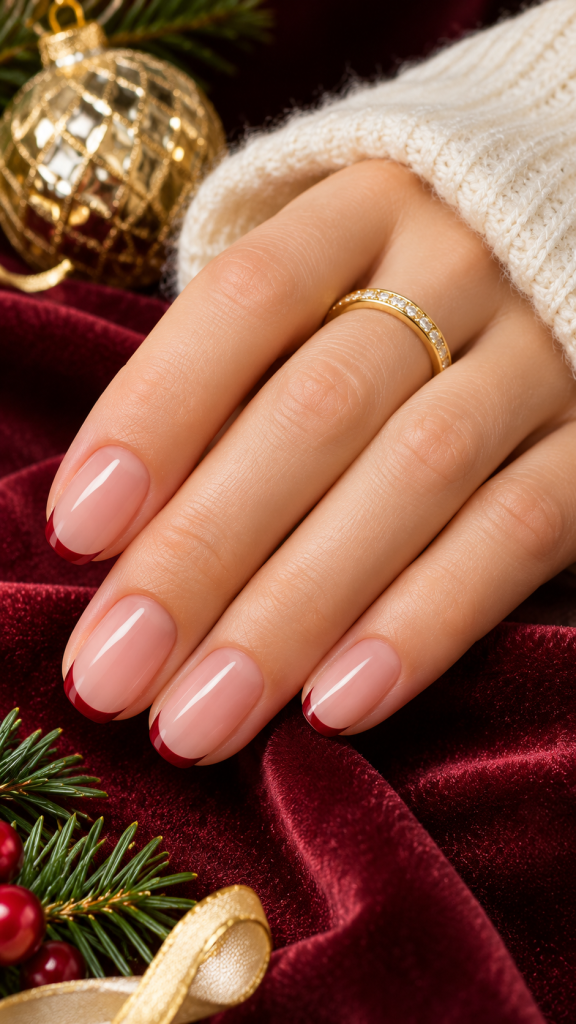
For anyone who wants a holiday manicure with more visible color, cranberry micro French tips offer a beautiful alternative to traditional bright-red Christmas nails.
This design maintains the clean sophistication of a classic French manicure while introducing a rich seasonal accent.
Instead of covering the entire nail in red polish, a thin cranberry line follows the natural curve of the tip.
The result feels festive, modern, and surprisingly delicate.
It is also a practical way to introduce holiday color without committing to a fully saturated manicure.
Why Cranberry Red Is Perfect for Simple Holiday Nails
Cranberry red occupies an attractive space between classic holiday red, berry pink, and sophisticated burgundy.
Its depth creates an elegant appearance, while its subtle berry undertones prevent the color from feeling excessively dark.
Unlike very bright red polish, cranberry often looks softer when applied as a narrow accent.
The contrast between a neutral nail base and a cranberry tip immediately creates definition.
This allows even an extremely simple manicure to appear carefully designed.
The color also complements several popular winter wardrobe shades.
Cream, charcoal, chocolate brown, camel, black, and forest green can all create attractive combinations with cranberry-red nail details.
For those who appreciate traditional Christmas colors but prefer contemporary styling, cranberry micro French tips provide a balanced solution.
Create a Clean Base With a Natural Nail Effect
A successful micro French manicure begins with a smooth, nearly natural-looking base.
Sheer rosy nude is an excellent choice because it enhances the natural appearance of the nail bed without competing with the colorful tips.
Milky beige creates a warmer effect, while translucent pink offers a more classic French manicure appearance.
Avoid excessively opaque base colors if the goal is a delicate finish.
The contrast between the neutral background and the cranberry tip should remain crisp.
A glossy base usually works best because it creates visual continuity with the final top coat.
However, a satin finish can offer a slightly more contemporary interpretation.
Before applying the colored tips, ensure the underlying polish is sufficiently dry to avoid dragging or mixing colors.
Master the Micro French Tip Without Complicated Tools
The micro French tip is much narrower than a traditional French manicure.
Instead of covering a large section of the nail’s free edge, the cranberry polish forms a fine curved line.
This gives the manicure its delicate appearance.
A thin detailing brush offers the greatest control.
Begin near one side of the nail, follow the natural curve of the tip, and connect the line toward the opposite corner.
Avoid applying too much polish at once.
Several small, controlled brush movements are easier to manage than one heavy stroke.
For beginners, a small amount of practice on a nail tip or disposable surface can help establish the preferred line thickness.
A fine brush lightly dipped in nail polish remover may help clean minor mistakes, provided it is kept away from irritated skin.
Another technique is using a French manicure guide, although curved guides may require adjustment for very narrow tips.
The final line should appear smooth and balanced rather than perfectly identical on every nail.
Natural nails differ slightly in shape, so subtle variations are completely normal.
The Secret to Keeping Red French Tips Elegant
One of the easiest ways to make a minimalist manicure appear less refined is adding too many competing decorative elements.
Cranberry micro French tips already provide a strong visual feature.
There is no need to combine them with large snowflakes, rhinestones, glitter gradients, and holiday illustrations.
For a slightly more festive interpretation, add one miniature gold dot near the base of a single accent nail.
Another possibility is introducing a tiny metallic line beneath the cranberry tip on one finger.
However, the most sophisticated option may be leaving the design completely undecorated.
A beautifully executed red curve against a clean nude background can make a stronger impression than a complicated pattern.
Choosing the Right Nail Length and Shape
Short oval nails are particularly suited to cranberry micro French tips.
Their rounded edges make it easier to create a continuous curved line.
Short almond nails provide a more elongated appearance, while squoval nails offer a practical and modern silhouette.
On very short nails, the tip should remain exceptionally fine to preserve the visible neutral base.
If the cranberry section becomes too thick, the manicure may resemble a conventional French tip rather than a micro French design.
Medium-length nails allow more flexibility, but keeping the line narrow preserves the distinctive minimalist aesthetic.
How to Create Cranberry Micro French Nails Step by Step
Start by shaping and cleaning the natural nails.
Apply a protective base coat and allow it to dry as directed.
Add one or two thin coats of sheer pink or neutral nude polish.
Once the base is ready, place a small amount of cranberry-red polish on a palette or other suitable surface.
Dip a fine nail art brush into the color, removing excess polish before approaching the nail.
Carefully trace the free edge using short, controlled strokes.
Repeat across the remaining nails, keeping the lines as consistent as possible.
Allow the colored tips to dry thoroughly before adding a glossy top coat.
Pay attention to the nail edges when applying the top coat, since a carefully sealed manicure can help protect the decorative design from premature chipping.
Avoid flooding the cuticles or applying unnecessarily thick layers.
The finished manicure should feel smooth, lightweight, and comfortable.
Holiday Outfit Combinations That Enhance Cranberry Nails
For a classic Christmas look, combine cranberry French tips with cream knitwear, gold jewelry, and a rich burgundy accessory.
For a more modern holiday outfit, pair the manicure with charcoal tailoring or a black velvet dress.
A simple white blouse can also create a beautiful contrast, allowing the cranberry accents to become a subtle focal point.
These nails are especially attractive for festive gatherings where you want seasonal color without looking overly themed.
They can also remain wearable after Christmas because cranberry is not exclusively associated with holiday decoration.
Best for: Elegant short nails, classic Christmas color lovers, minimalist French manicure enthusiasts, winter date nights, and anyone who wants a festive design that remains wearable beyond December.
🥉 Best 3 Simple Holiday Nails With Soft Pearl Shimmer and Tiny Festive Details
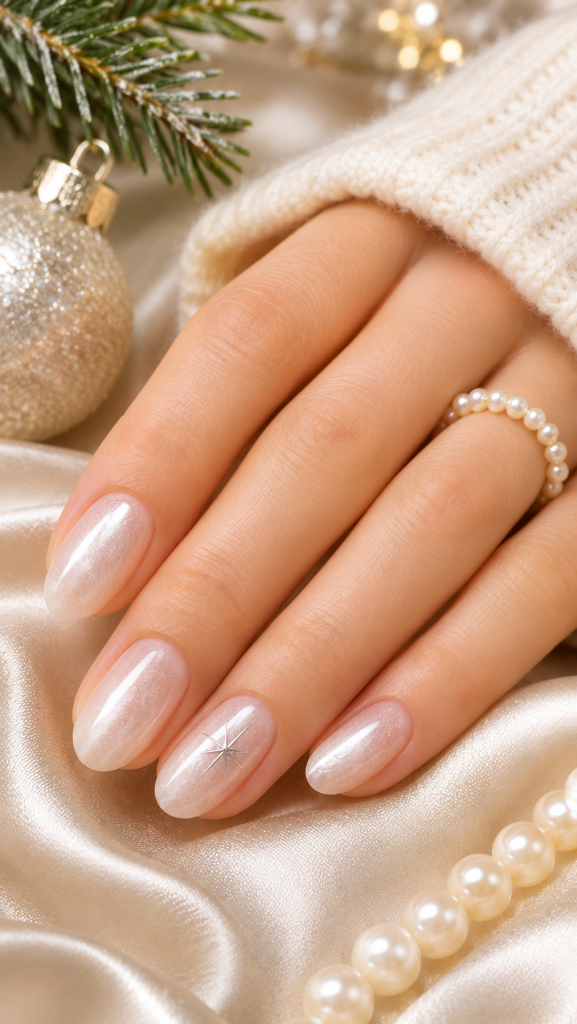
Soft pearl shimmer offers a luminous interpretation of holiday nail art that feels dreamy, delicate, and exceptionally versatile.
Rather than relying on bold glitter particles or highly reflective metallic decoration, this design uses a subtle pearlescent finish to create a gentle glow.
The appearance resembles polished porcelain, winter frost, or delicate pearl jewelry.
A few miniature festive details can introduce seasonal character without distracting from the beautiful surface.
The result is a manicure that feels magical while remaining simple enough for everyday wear.
Why Pearl Shimmer Creates a Sophisticated Holiday Manicure
Pearlescent nail polish reflects light softly across the surface of the nail.
Unlike chunky glitter, which creates distinct sparkling particles, fine pearl shimmer produces a more continuous luminous effect.
This subtle difference can make a manicure appear particularly polished.
Pearl finishes also work beautifully with pale winter-inspired colors.
Milky white, icy pink, soft ivory, and translucent lavender can all create elegant variations.
A cool pearl finish feels fresh and wintery, while a warmer ivory pearl creates a softer, romantic appearance.
Because the shimmer itself provides visual interest, very little additional decoration is necessary.
This makes pearl manicures especially suitable for beginners who want beautiful results without learning advanced nail art techniques.
Choose Between Milky White and Sheer Pearl Pink
The base color has a significant influence on the final appearance.
Milky white creates a delicate winter-inspired look that feels clean, bright, and timeless.
Sheer pearl pink produces a more natural appearance, allowing some of the nail’s underlying color to remain visible.
For a warmer interpretation, choose soft ivory with a subtle golden or neutral pearl reflection.
Those who prefer a cooler aesthetic may enjoy translucent white with fine silver-toned shimmer.
The goal is gentle luminosity rather than an opaque, heavily frosted appearance.
Apply the polish in thin layers and evaluate the coverage between coats.
Some pearl polishes reveal brush marks when applied unevenly.
Using smooth, controlled strokes and avoiding excessive brushing can help achieve a more consistent finish.
Add Miniature Stars Without Overwhelming the Design
Tiny stars offer a charming way to introduce festive character.
However, they should remain secondary to the soft pearl finish.
One particularly elegant technique involves painting a miniature silver star on a single accent nail.
A tiny four-point sparkle can be easier to create than a traditional five-point star.
Draw one short vertical line and one horizontal line crossing at the center.
For a more delicate result, taper the ends or add an extremely small dot nearby.
A fine detail brush is useful, although beginners may prefer a small nail art sticker.
Choose stickers with a thin profile so they do not create bulky raised surfaces.
Another alternative is placing one miniature silver dot on two nails while leaving the remaining fingers undecorated.
This creates a balanced result without requiring detailed freehand painting.
Use Negative Space to Maintain a Minimalist Appearance
Negative space refers to areas of the nail that remain visually undecorated or covered only with a translucent base.
It is an essential feature of many sophisticated minimalist nail designs.
With pearl shimmer, negative space can be created by keeping accent details small and allowing the luminous background to remain visible.
Avoid filling every nail with stars, dots, and decorative lines.
Instead, select one or two fingers as focal points.
The remaining nails can showcase the pearlescent polish without additional artwork.
This contrast between decorated and undecorated nails creates visual rhythm.
It also makes the manicure easier to recreate and maintain.
How to Recreate Pearl Shimmer Holiday Nails at Home
Begin with clean, shaped nails and a suitable base coat.
Apply a thin layer of milky white or sheer pink polish if the pearl shade needs an underlying base.
Once dry, add one or two thin coats of fine pearlescent polish.
Allow the finish to settle before applying decorative elements.
For the accent nail, paint a tiny silver sparkle or carefully position a miniature nail sticker.
Keep the decoration small enough that it does not dominate the manicure.
Finish with a smooth glossy top coat.
A glossy finish enhances the luminous quality of the pearlescent pigment while helping protect the design.
If using stickers, ensure the edges are properly sealed beneath the top coat to reduce the chance of lifting.
Finish with cuticle oil once the manicure is fully dry.
The final effect should look clean, luminous, and delicately festive.
Why Pearl Nails Work Beyond Christmas
One of the greatest advantages of this design is its versatility.
Although pearl shimmer creates a beautiful winter atmosphere, it does not depend on obvious Christmas imagery.
The manicure therefore works for New Year’s Eve, winter weddings, holiday dinners, and everyday winter outfits.
It also complements a wide range of jewelry finishes.
Silver accessories enhance the cooler reflections, while gold jewelry introduces an attractive contrast.
Pearl earrings, delicate rings, and satin fabrics can make the manicure feel especially coordinated.
For a festive evening look, pair the nails with an ivory blouse, black velvet dress, or shimmering champagne-colored outfit.
For daytime styling, soft knitwear and neutral accessories allow the manicure to appear effortlessly elegant.
Best for: Minimalist winter manicures, short oval nails, elegant holiday parties, subtle New Year’s Eve looks, and anyone who loves luminous finishes without heavy glitter.
How to Choose the Best Simple Holiday Nails for Your Personal Style
Although all three designs share a minimalist approach, each creates a different impression.
Champagne-gold accents emphasize warmth, delicate metallic details, and understated luxury.
Cranberry micro French tips introduce richer color while preserving a classic manicure structure.
Pearl shimmer focuses on luminosity, softness, and subtle winter-inspired details.
The best choice depends on your preferred color palette, lifestyle, nail length, and upcoming celebrations.
| Holiday nail design | Main colors | Difficulty | Best nail shapes | Ideal occasion |
|---|---|---|---|---|
| Champagne Gold Accents | Nude, beige, champagne gold | Easy | Almond, oval, squoval | Christmas dinners and New Year’s Eve |
| Cranberry Micro French Tips | Sheer pink, cranberry red | Easy to moderate | Oval, almond, squoval | Christmas parties and winter outings |
| Soft Pearl Shimmer | Milky white, pearl pink, silver | Easy | Oval, round, almond | Winter celebrations and elegant parties |
If you prefer subtle jewelry and neutral clothing, champagne-gold accents may feel like the most natural extension of your style.
If you love classic red manicures but want something lighter, cranberry French tips provide a beautiful compromise.
If soft winter colors and luminous beauty finishes appeal to you, pearl shimmer may become your favorite holiday manicure.
Remember that minimalism does not require identical nail shapes or specific nail lengths.
A beautifully maintained short manicure can look every bit as elegant as a longer set.
Simple Holiday Nails for Short Natural Nails
Short natural nails are particularly well suited to minimalist holiday designs.
Their compact surface encourages thoughtful decoration and prevents elaborate details from becoming visually overwhelming.
They are also comfortable for everyday activities such as typing, cooking, cleaning, and managing holiday preparations.
However, shorter nails benefit from a few deliberate styling adjustments.
Keep Decorative Elements Proportional
Tiny gold dots, delicate shimmer, and fine French tips work particularly well on short nails.
Large illustrations or thick metallic sections can visually dominate the limited nail surface.
Choose one defining detail and allow it to remain the focal point.
For example, a tiny champagne-gold dot can look more refined than several overlapping ornaments.
Similarly, a very fine cranberry tip helps preserve the appearance of a longer nail bed.
Choose Shapes That Complement Your Natural Nails
Rounded nails offer a soft, classic appearance and are easy to maintain.
Oval nails provide a slightly elongated effect, while squoval nails combine straight edges with gently rounded corners.
Almond nails generally require a little more free-edge length to create their characteristic taper.
There is no need to force a dramatic shape onto nails that are naturally very short.
A neatly filed shape that suits the existing nail structure often produces the most attractive result.
Use Glossy Finishes to Enhance the Overall Look
A smooth glossy top coat can make simple nail designs feel more complete.
It creates a uniform reflective surface and emphasizes clean edges.
For minimalist manicures, the quality of the finish is often just as important as the decorative artwork.
Avoid applying thick layers in an attempt to create extra shine.
Thin, even coats generally produce a smoother and more comfortable result.
Easy Holiday Nail Color Combinations That Look Expensive
Choosing a harmonious color palette is one of the simplest ways to elevate holiday nail art.
Instead of combining every traditional festive shade, focus on two or three complementary colors.
A limited palette helps the manicure feel coordinated and intentional.
Sheer nude and champagne gold create a warm, polished look suitable for understated celebrations.
Soft pink and cranberry red offer a modern interpretation of traditional Christmas colors.
Milky white and pearl silver create a delicate winter-inspired finish with subtle luminosity.
Creamy beige and muted bronze provide a warmer alternative for those who prefer earthy neutral tones.
Blush pink and soft rose gold introduce a romantic festive appearance without depending on obvious holiday motifs.
The goal is not to avoid color altogether.
Instead, use color carefully so each shade contributes to the overall design.
For a particularly refined result, avoid mixing several competing finishes on the same nail.
Pairing one neutral base with one decorative accent is often enough.
How to Make Simple Holiday Nails Look Professionally Finished
Even the most beautiful nail design can lose its polished appearance when the preparation or application is rushed.
Fortunately, several straightforward techniques can make at-home manicures look cleaner and more consistent.
Prepare the Nails Before Applying Polish
Begin by removing old polish and gently shaping the nails.
Avoid aggressive filing or excessive buffing, which can weaken the natural nail.
Clean the nail surface and remove visible residue before applying the base coat.
If the nails are damp, allow them to dry before beginning the manicure.
Proper preparation helps create a smoother foundation for the polish.
Apply Thin Layers Instead of Thick Coats
Thick layers can lead to uneven coverage, longer drying times, and accidental smudging.
Thin layers are easier to control and usually create a more consistent finish.
Follow the instructions for the specific polish system, since ordinary air-dry polish and gel products have different application and curing requirements.
Never assume that gel polish will cure simply by air-drying.
Use only the appropriate curing equipment and instructions for products that require it.
Keep the Cuticle Area Clean
A neat border around the nail makes a manicure look more professional.
Leave a small, even margin between the polish and surrounding skin.
If polish touches the skin, clean it carefully before the final finish sets.
Avoid cutting living cuticle tissue or scraping the nail surface aggressively.
Gentle nail care is more important than achieving an artificially perfect-looking border.
Finish With a Suitable Top Coat
The top coat helps unify the appearance of the manicure and protects decorative details.
Choose a product compatible with the underlying polish.
Apply it carefully, paying attention to the tips without creating excessive buildup.
Allow the manicure to dry or cure according to the product instructions.
Avoid exposing freshly applied regular polish to friction or pressure before it has hardened sufficiently.
Moisturize the Skin Around Your Nails
Dry or irritated cuticles can distract from even a beautifully executed manicure.
Regular cuticle oil and hand moisturizer can help maintain a healthy-looking appearance.
Apply moisturizing products after the manicure has dried, and continue using them during cold or dry weather.
A simple hand-care routine often makes a noticeable difference in close-up manicure photographs.
Important Note: A luxurious-looking holiday manicure depends more on clean application, balanced colors, and healthy nail care than on expensive products or elaborate decorations. If you use gel products, prevent uncured gel from contacting the skin and follow the manufacturer’s curing directions. Stop using any nail product that causes irritation or an allergic reaction.
Common Mistakes That Make Simple Holiday Nail Designs Look Too Busy
Minimalist nail art depends on careful balance.
When too many decorative details compete for attention, the finished design may lose the elegance that made it appealing.
One common mistake is combining multiple festive motifs on every nail.
For example, adding stars, glitter, snowflakes, metallic stripes, and rhinestones to the same manicure can create visual clutter.
Another mistake is using decorative elements that are too large for the nail surface.
A tiny metallic dot may look delicate on a short oval nail, while a large ornament can overwhelm the same space.
Color selection also matters.
Mixing highly saturated red, green, gold, silver, and white without a cohesive plan can make the design feel disconnected.
Instead, choose one primary neutral, one accent color, and perhaps one subtle metallic finish.
Uneven polish application is another issue.
A beautifully coordinated design can appear less refined when the surface contains thick ridges, visible smudges, or irregular edges.
Prioritize smooth preparation and patient application before attempting complicated decorations.
Finally, avoid assuming that longer nails automatically look more elegant.
Short nails with clean shaping, flattering colors, and thoughtful accents can be equally beautiful.
How to Adapt Simple Holiday Nails From Christmas to New Year’s Eve
One of the most practical benefits of minimalist holiday manicures is their ability to transition between celebrations.
A thoughtfully chosen design can remain appropriate for several different occasions.
Champagne-gold nails are particularly versatile because their warm metallic details already complement both Christmas and New Year’s styling.
To create a more glamorous evening appearance, coordinate them with metallic accessories or a satin outfit rather than adding extra nail decorations.
Cranberry micro French tips can feel especially festive at Christmas.
However, their clean structure allows them to remain elegant afterward.
Pairing the manicure with black, ivory, or champagne-colored clothing can give it a less traditionally Christmas-focused appearance.
Pearl shimmer provides perhaps the easiest transition.
Its luminous finish looks wintery without depending on recognizable holiday symbols.
For New Year’s Eve, the design can be enhanced through sparkling jewelry, a sophisticated outfit, or a single delicate silver accent nail.
If you choose to refresh an existing manicure, use compatible products and avoid trapping moisture beneath lifting or damaged polish.
Do not peel off gel polish or aggressively scrape the nail surface to change the design.
The most effective approach is to choose a manicure that already suits multiple occasions, reducing the need for frequent removal and reapplication.
Frequently Asked Questions About Simple Holiday Nails
What Are the Easiest Holiday Nail Designs for Beginners?
Some of the easiest holiday nail designs include sheer nude nails with tiny gold dots, milky white nails with pearl shimmer, and simple accent nails featuring one festive color.
These designs require relatively few tools and do not depend on complicated freehand illustrations.
Micro French tips may require slightly more practice, but they remain achievable with patience and a fine detailing brush.
Can Simple Holiday Nails Look Good on Very Short Nails?
Absolutely.
Very short nails can look beautiful with delicate shimmer, neutral polish, tiny metallic accents, and narrow French tips.
The most important consideration is keeping decorative elements proportional to the nail surface.
Rounded and squoval shapes are especially practical for shorter natural nails.
What Holiday Nail Colors Look the Most Elegant?
Champagne gold, cranberry red, milky white, sheer pink, deep burgundy, soft silver, and muted rose gold are attractive choices for sophisticated holiday manicures.
Neutral bases paired with one carefully chosen festive accent often create a particularly refined appearance.
Are Minimalist Holiday Nails Suitable for Christmas Parties?
Yes.
Minimalist manicures can complement festive clothing without competing with elaborate outfits or accessories.
Champagne-gold accents work beautifully with elegant eveningwear, while cranberry French tips introduce recognizable seasonal color.
Pearl shimmer offers a softer alternative for romantic or understated styling.
How Can I Make My Holiday Nails Look Expensive Without Visiting a Salon?
Focus on careful nail preparation, smooth polish application, flattering colors, and a limited number of decorative details.
A neat nail shape and clean cuticle area can make a significant difference.
Using a suitable base coat and top coat also helps create a more polished final appearance.
How Long Do Simple Holiday Nails Last?
Longevity varies depending on the polish system, nail preparation, application, daily activities, and individual nail condition.
Regular polish may remain attractive for several days, while professionally applied and properly cured gel systems can last longer.
However, longevity should never come at the expense of nail health.
Remove or repair lifting, damaged, or uncomfortable nail products appropriately rather than attempting to extend their wear indefinitely.
Can I Wear Simple Holiday Nails After Christmas?
Yes.
Designs that rely on subtle metallic accents, cranberry French tips, or pearl shimmer are not restricted to Christmas.
They can complement winter outfits, New Year’s celebrations, formal occasions, and everyday styling throughout the colder months.
Choosing versatile colors is an excellent way to make a seasonal manicure feel appropriate beyond a single holiday.
Final Thoughts on the Best Simple Holiday Nails
The most beautiful simple holiday nails demonstrate that festive beauty does not have to be complicated.
A carefully chosen color palette, smooth polish application, and a few elegant details can create a manicure that feels sophisticated, celebratory, and effortlessly stylish.
Champagne-gold accents are an excellent choice for anyone who loves understated luxury and warm metallic touches.
Cranberry micro French tips offer a modern way to incorporate classic holiday color while maintaining a clean, refined appearance.
Soft pearl shimmer delivers luminous winter elegance with minimal effort and beautifully subtle festive details.
Each design has its own personality, yet all three share the same essential principle: beautiful nail art often comes from knowing when to keep things simple.
Whether you are preparing for Christmas dinner, a holiday gathering, or a New Year’s Eve celebration, these easy holiday nail ideas can help you achieve a polished look without overwhelming your natural nails.
Choose the design that best reflects your personal style, give every detail the attention it deserves, and let your manicure become a small but memorable part of your holiday look.