Simple Nail Art Designs are proof that you do not need complicated techniques, professional salon equipment, or hours of practice to achieve a beautiful manicure. Sometimes, the smallest details create the most sophisticated results. A tiny metallic accent, a delicate curved line, or a miniature floral motif can transform ordinary nails into something that looks polished, modern, and surprisingly luxurious.
The beauty of simple nail art lies in its versatility. Whether you prefer short natural nails, elegant almond shapes, or classic square tips, minimalist decorations can complement almost any nail length and personal style. They are also perfect for women who love the appearance of professionally designed nails but appreciate the convenience of creating beautiful manicures at home.
From understated everyday elegance to romantic weekend looks, simple nail designs offer endless possibilities without overwhelming your fingertips with unnecessary details.
The secret is not how many decorations you add. It is how carefully you choose your colors, balance your composition, and create a clean finish.
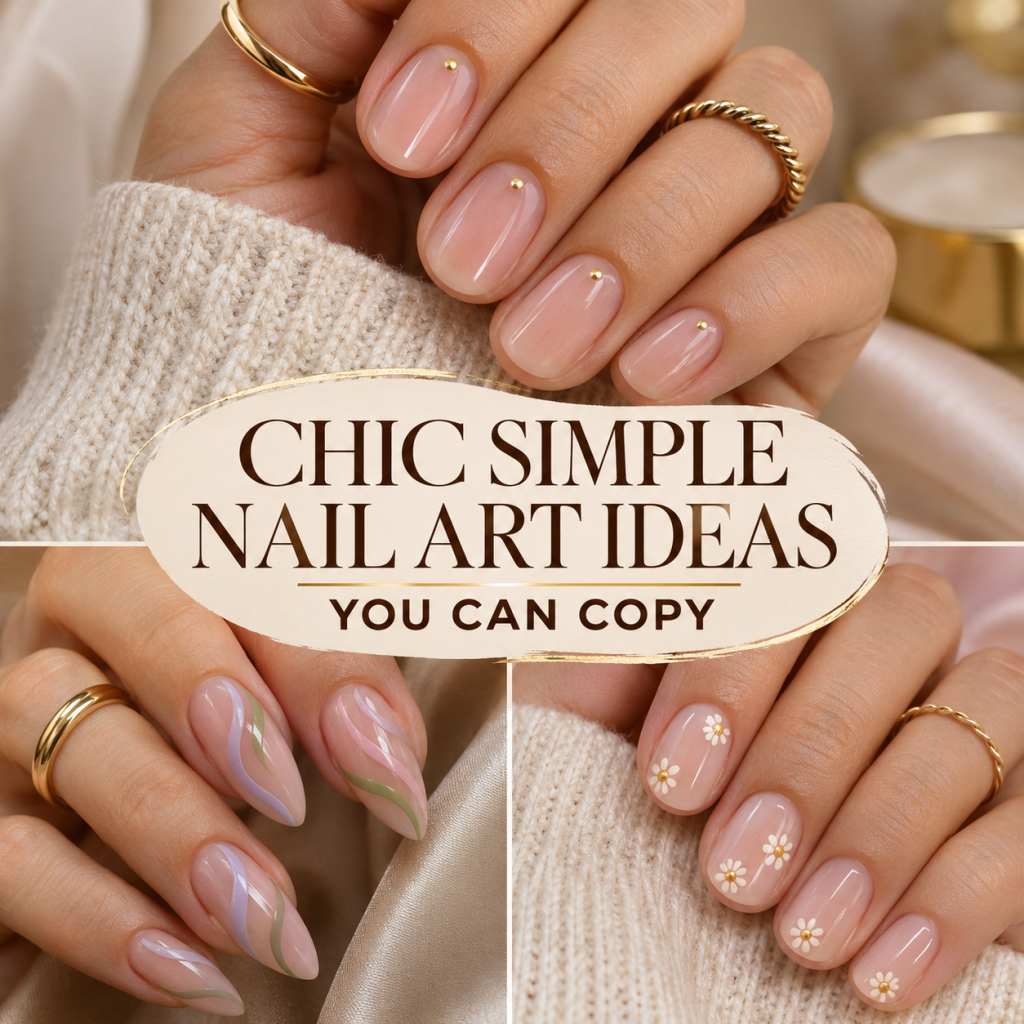
Among the countless easy nail art ideas available, three styles stand out for their timeless beauty, beginner-friendly techniques, and luxurious appearance: minimalist gold dot accents, delicate pastel swirl lines, and tiny floral details.
These three designs offer distinctly different aesthetics while sharing one essential quality: they make simplicity look extraordinary.
Why Simple Nail Art Designs Are Becoming a Timeless Beauty Essential
The appeal of simple nail art goes far beyond convenience. Minimalist manicures have a special ability to look fashionable without depending heavily on seasonal colors, complicated patterns, or fleeting trends.
A beautifully applied neutral polish with one carefully positioned decorative detail can appear just as refined as an elaborate salon manicure. In many cases, subtle designs create an even stronger impression because every element has room to stand out.
Simple nail designs also fit naturally into different lifestyles. A soft pink manicure with tiny gold dots can look elegant in a professional environment. Pastel swirls can add creativity to casual outfits, while miniature floral accents can create a romantic finishing touch for special occasions.
Another advantage is adaptability.
Unlike highly detailed nail art that often requires longer nail extensions, minimalist patterns work particularly well on short and medium-length nails. This makes them accessible to people who prefer natural nails or need practical manicures for everyday activities.
They also provide an ideal introduction to nail art for beginners.
You do not need to master advanced brushwork immediately. Starting with uncomplicated shapes allows you to develop control, experiment with colors, and understand how decorative placement changes the overall appearance of a manicure.
The result is a style that feels effortless while still looking intentional.
🥇 Best 1 Simple Nail Art Designs With Minimalist Gold Dot Accents
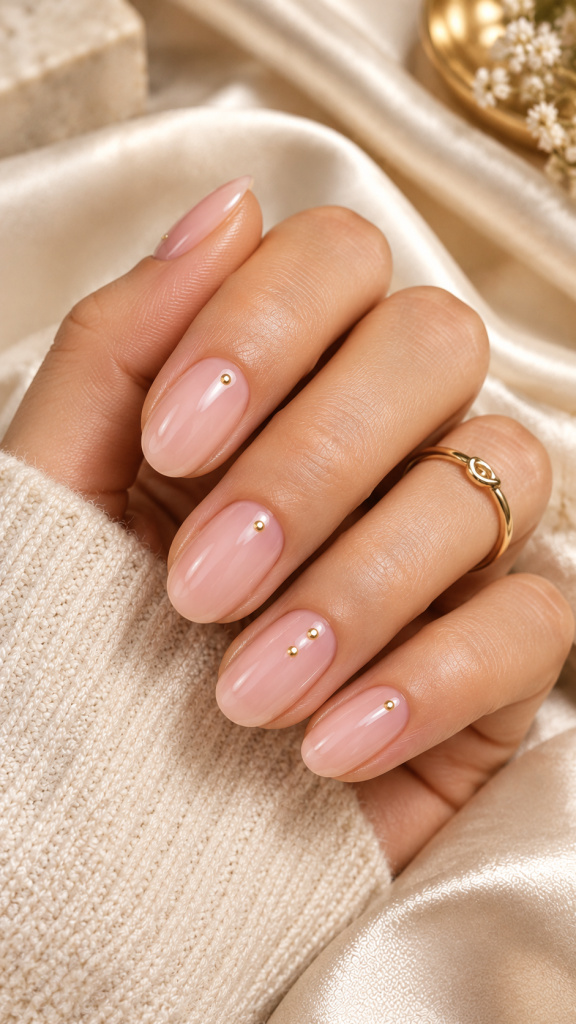
Minimalist gold dot nails are one of the most elegant ways to create expensive-looking nail art without complicated techniques.
This design combines a beautifully polished neutral base with tiny metallic dots placed strategically across the nails. The contrast between soft natural colors and delicate golden details produces an appearance reminiscent of sophisticated jewelry.
Rather than covering the entire nail with glitter or elaborate metallic patterns, the design focuses on restraint.
A single gold dot near the cuticle, two tiny accents along one side, or a carefully arranged cluster can make even the simplest manicure feel special.
The Secret Behind the Luxurious Minimalist Appearance
The success of minimalist gold dot nail art depends on three important elements: color harmony, placement, and proportion.
Start with a neutral base that complements your skin tone.
Sheer blush pink creates a romantic and feminine effect, while creamy beige offers understated sophistication. Milky nude polish produces a soft, clean appearance that works beautifully with delicate metallic decorations.
For a warmer finish, consider peachy nude or muted rose beige.
Gold accents appear particularly attractive against these colors because the metallic details provide just enough contrast without becoming overpowering.
Placement is equally important.
Instead of applying identical decorations everywhere, create a balanced composition that allows the natural beauty of each nail to remain visible.
For example, position one tiny dot near the lower center of the index finger, two small dots on the ring finger, and leave the remaining nails undecorated.
This subtle variation adds visual interest while maintaining a cohesive overall style.
The dots should also remain relatively small.
Large metallic circles can create a playful polka-dot effect, while miniature accents feel more delicate and sophisticated.
How to Create Minimalist Gold Dot Nails at Home
This is one of the easiest nail designs to recreate, even if you have very little experience.
You will need:
- A gentle nail file and basic manicure tools
- A suitable base coat
- Sheer nude, blush pink, or beige nail polish
- Metallic gold nail polish or nail-safe decorative dots
- A fine dotting tool or clean rounded nail art tool
- A glossy top coat
Begin by shaping your nails into your preferred silhouette. Short oval nails are particularly suitable for this style because their rounded edges reinforce the delicate appearance.
Gently prepare the nail surface and remove any excess oil before applying your base coat.
Next, apply one or two thin layers of neutral nail polish, allowing each layer to dry according to the manufacturer’s instructions.
Once the base color is ready, dip your dotting tool lightly into metallic gold polish.
Place a tiny dot near the cuticle area of one nail, leaving a small margin so the polish does not touch the skin.
Repeat on selected nails, varying the placement slightly while preserving a coordinated composition.
Allow the accents to dry completely before finishing with a smooth glossy top coat.
The final result should appear clean, delicate, and beautifully balanced.
Best Colors and Nail Shapes for Gold Dot Accents
Although gold dots pair naturally with neutral colors, you can personalize the look without sacrificing its minimalist character.
For a classic luxury aesthetic, combine warm beige with champagne gold.
For a softer romantic appearance, choose translucent pink with delicate pale-gold accents.
If you prefer contemporary sophistication, pair muted taupe with understated metallic dots.
Short oval nails emphasize simplicity, while medium almond nails create a graceful elongated silhouette. Soft square nails offer a modern interpretation that works especially well for everyday wear.
Avoid combining too many contrasting colors within the same manicure.
The strongest version of this design usually features one neutral base color and one metallic accent.
When to Wear This Simple Nail Art Design
Minimalist gold dot nails are particularly versatile because they can transition effortlessly between casual and formal settings.
They complement tailored office outfits, neutral knitwear, elegant evening dresses, and understated accessories.
They are also an excellent choice for weddings, dinner celebrations, professional events, and everyday manicures when you want something beautiful without excessive decoration.
For an especially polished appearance, coordinate your gold accents with delicate jewelry such as thin rings or small earrings.
Why This Design Earns First Place
Gold dot nail art combines the easiest decorative technique with one of the most sophisticated visual results.
It requires minimal equipment, works on almost every nail length, and can be adapted to numerous personal styles.
Most importantly, it proves that a tiny detail can create an unexpectedly luxurious manicure.
🥈 Best 2 Simple Nail Art Designs With Delicate Pastel Swirl Lines
If minimalist gold dots represent understated elegance, pastel swirl nail art introduces a gentle sense of movement and creativity.
This design features thin, flowing lines that curve gracefully across a neutral or translucent nail base.
The lines may appear in soft lavender, dusty blue, pale peach, muted sage, or creamy pastel pink.
Instead of forming rigid geometric patterns, they create organic shapes that feel modern, artistic, and beautifully relaxed.
The effect is visually interesting without becoming complicated.
It is the perfect option for anyone who wants simple nail art designs with a slightly more expressive personality.
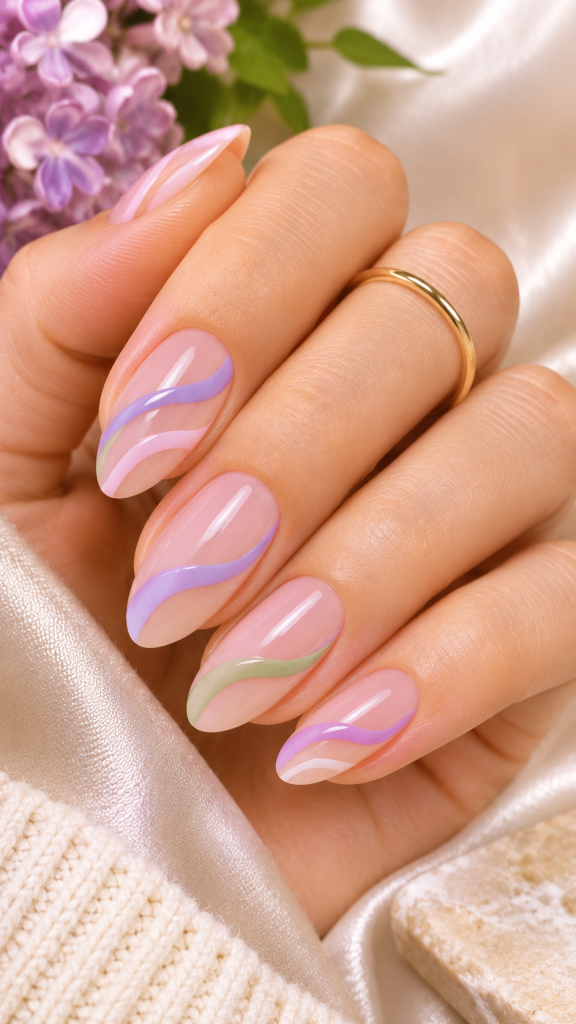
Why Pastel Swirl Nails Look So Elegant
The beauty of pastel swirls comes from their fluid shapes and carefully restrained color palette.
Curved lines naturally guide the eye along the nail, creating a feeling of movement that can make even short nails appear thoughtfully designed.
When these lines are thin and lightly spaced, the natural base remains visible.
This negative-space effect helps prevent the manicure from looking crowded.
Color selection also makes a significant difference.
Soft pastel shades complement translucent pink or beige bases without creating harsh contrasts.
Dusty lavender and pale blue, for instance, produce a dreamy, contemporary combination.
Muted sage paired with creamy peach creates a subtle botanical feeling, while blush pink and pale lilac offer a delicate romantic aesthetic.
The key is to choose colors with similar softness and saturation.
Combining too many intense shades can make the design appear busier than intended.
How to Create Delicate Pastel Swirl Nails
Swirl nail art requires slightly more control than simple dots, but the technique remains approachable for beginners.
You will need:
- Base coat
- Sheer pink, nude, or translucent nail polish
- One or two complementary pastel nail polish colors
- A thin nail art liner brush
- A small amount of nail polish remover for correcting mistakes
- Glossy top coat
Begin with clean, shaped nails and apply a protective base coat.
Add a thin layer of your chosen neutral polish and allow it to dry properly.
Next, place a small amount of pastel polish onto a suitable nail art palette.
Using a fine liner brush, paint one gentle curved line from the side of the nail toward the tip.
The line does not need to be perfectly symmetrical.
In fact, slightly organic curves often produce a more natural and sophisticated appearance.
For added dimension, create a second thin line that follows part of the first curve without completely overlapping it.
You can use the same pastel shade or introduce one additional complementary color.
Keep the lines separated by small areas of visible base polish.
This creates visual breathing room and prevents the pattern from appearing overly complicated.
Repeat the design on two or three nails, leaving the others plain or decorated with only one delicate curve.
Once the artwork is fully dry, finish with a glossy top coat.
Three Ways to Personalize Pastel Swirl Nail Art
One of the greatest advantages of swirl designs is that you can adapt them to different aesthetics without changing the basic technique.
Soft romantic swirls
Choose a translucent pink base and add thin lilac or pale peach curves. This creates a dreamy manicure that pairs beautifully with feminine clothing and delicate accessories.
Modern neutral swirls
Use warm beige as the base and introduce muted taupe or creamy ivory lines. The result feels sophisticated and understated, making it suitable for professional settings.
Fresh botanical swirls
Combine sheer nude nails with muted sage green and soft pastel yellow. This variation adds a subtle nature-inspired appearance without becoming overly colorful.
Each version preserves the same essential concept: delicate flowing lines, controlled color choices, and generous negative space.
Choosing the Right Swirl Placement
Swirl placement can influence how your nails appear.
A vertical or diagonal curve can create an elongated visual effect, particularly on shorter nails.
A gentle line following one side of the nail offers an asymmetrical contemporary appearance.
For medium almond nails, a flowing curve that begins near the lower side and continues toward the tip can emphasize the natural shape beautifully.
Avoid making every nail identical if you prefer a more editorial manicure.
Instead, repeat the same color palette while slightly adjusting the direction of individual swirls.
This technique creates a coordinated design that still feels creative and personal.
Common Mistakes to Avoid
The most frequent mistake with swirl nail art is applying too much polish to the brush.
Thick lines can quickly overwhelm a small nail surface.
Use a lightly loaded brush and build the design gradually.
Another common issue is introducing too many colors. Two pastel shades are usually sufficient for a refined result.
Finally, avoid rushing the drying process.
Applying top coat before the decorative lines have dried can cause smearing and reduce the crispness of the finished manicure.
Why This Design Earns Second Place
Pastel swirl nails offer an excellent balance between simplicity and artistic expression.
They require a little more practice than basic dot accents, but they reward that effort with a graceful design that feels contemporary, versatile, and visually distinctive.
For people who enjoy creative beauty details without excessive decoration, this style is particularly appealing.
🥉 Best 3 Simple Nail Art Designs With Tiny Floral Accent Details
Tiny floral nail art brings a romantic and charming dimension to minimalist manicures.
Unlike elaborate botanical nail paintings, this style uses miniature flowers, delicate petals, and restrained decorative placement.
A single small daisy on a ring finger or a tiny blossom near the tip of a neutral nail can transform an ordinary manicure into something soft and memorable.
The design works especially well with natural-looking base colors because the flowers become the central visual feature.
It is one of the loveliest simple nail art ideas for people who appreciate feminine elegance, gentle botanical inspiration, and understated creativity.
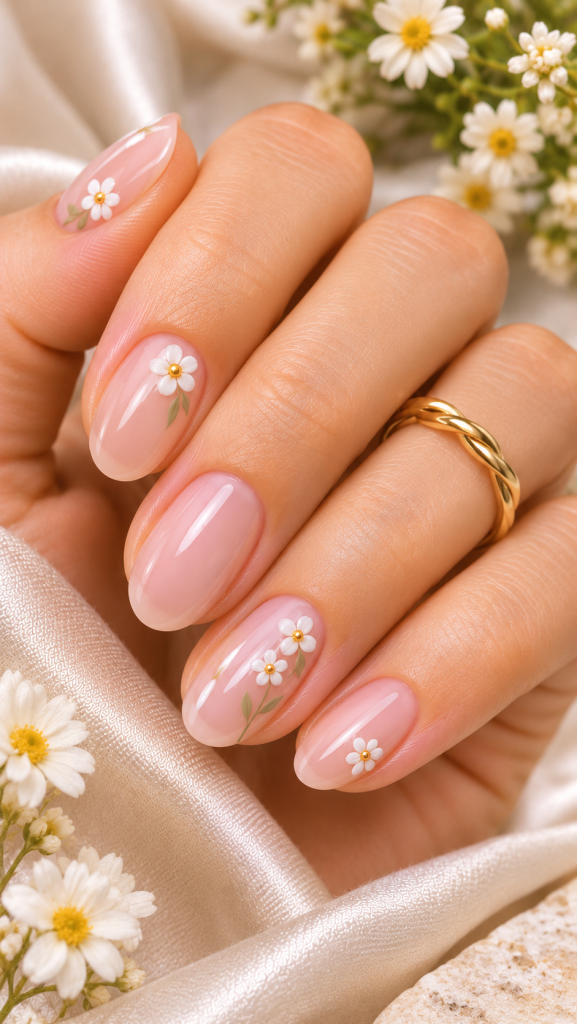
The Beauty of Miniature Floral Nails
Floral nail art can appear complicated when you imagine detailed roses, intricate leaves, and multiple layers of color.
However, minimalist floral designs rely on a much simpler concept.
A flower can be created using only five small dots arranged around a central accent.
This basic technique produces a recognizable blossom without requiring advanced painting skills.
The miniature scale also helps preserve the clean appearance of the manicure.
Instead of covering the entire nail with decorations, place one tiny flower toward the outer edge or near the tip.
The surrounding negative space keeps the design modern rather than overly ornate.
For a particularly refined result, choose delicate ivory petals with a muted gold or pale yellow center.
Soft blush petals on a milky beige background create another attractive combination.
The overall impression should be gentle and harmonious.
How to Create Tiny Floral Nail Art at Home
This technique is ideal for beginners who want to experiment with decorative nail art beyond simple geometric accents.
You will need:
- Nail base coat
- Sheer pink, nude, or milky beige polish
- White, ivory, or pale pastel polish for petals
- A contrasting color for the flower center
- A small dotting tool
- A very fine brush, if desired
- Clear glossy top coat
Start by preparing your nails and applying the base coat.
Next, add your chosen neutral polish in thin, even layers.
After the base has dried, select one nail for your floral accent.
Dip a small dotting tool into ivory or pastel polish.
Create five tiny dots in a circular arrangement, leaving a small space in the center.
The dots should be close enough to suggest flower petals without merging into one large shape.
Use a smaller tool to place a contrasting dot in the middle.
For a classic daisy-inspired appearance, combine creamy white petals with a pale golden center.
For something more romantic, use blush pink petals and a soft champagne-colored center.
Allow the flower to dry before sealing it with top coat.
You can repeat the design on another nail or leave the remaining fingers plain.
The finished manicure should look delicate rather than heavily decorated.
How to Make Floral Nails Look Modern Instead of Busy
The biggest difference between a sophisticated floral manicure and a crowded design is the amount of decoration.
If every nail features multiple large flowers, the visual effect may become playful rather than minimal.
For a cleaner approach, use one tiny flower on each accent nail.
Choose a restrained color palette with no more than two decorative shades.
Keep the flowers small relative to the nail surface, and avoid adding numerous additional patterns.
Negative space is particularly valuable.
A delicate blossom positioned on an otherwise neutral nail often creates a stronger visual impact than several overlapping flowers.
You can also experiment with asymmetrical placement.
For example, place a miniature daisy near the lower-left corner of one nail and another near the upper-right corner of a different nail.
This creates an editorial-inspired composition while keeping the manicure beautifully simple.
Best Nail Shapes for Tiny Floral Details
Short oval nails provide a soft, natural canvas for miniature flowers.
Their gently rounded shape complements botanical details and creates an especially charming everyday manicure.
Short square nails offer a more contemporary appearance, particularly when paired with a sheer beige base.
Medium almond nails can accommodate slightly larger floral accents while maintaining an elegant silhouette.
The most important consideration is scale.
On very short nails, one small blossom is usually more visually balanced than a cluster of flowers.
On medium nails, you may add a delicate leaf or second miniature blossom if the overall design still feels spacious.
Perfect Occasions for Delicate Floral Nail Art
Tiny floral nails are particularly attractive for romantic dinners, celebrations, holidays, casual weekends, and special events.
They also work beautifully as everyday manicures when you want a subtle decorative element.
For warmer months, soft pastel flowers create a fresh, airy appearance.
During cooler seasons, muted rose, dusty mauve, or creamy ivory flowers can bring a gentle romantic touch to neutral outfits.
This flexibility makes floral nail accents suitable throughout the year rather than limiting them to one specific season.
Why This Design Earns Third Place
Miniature floral nail art creates a beautiful balance between charm and sophistication.
It requires more patience than simple gold dots, but the basic dotting technique is easy to learn.
The finished design feels feminine, creative, and timeless without sacrificing the clean aesthetic that makes minimalist manicures so appealing.
Simple Nail Art Designs Comparison Which Style Should You Choose
Although all three styles are beginner-friendly, they provide different visual effects and require slightly different techniques.
| Nail Art Style | Difficulty | Best Feature | Overall Aesthetic |
|---|---|---|---|
| Minimalist Gold Dots | Very Easy | Tiny metallic accents | Elegant and luxurious |
| Delicate Pastel Swirls | Easy to Moderate | Flowing curved lines | Creative and contemporary |
| Tiny Floral Accents | Easy | Miniature blossoms | Romantic and feminine |
Choose minimalist gold dots if your priority is achieving an elegant manicure with the least possible effort.
Select pastel swirls if you enjoy experimenting with color combinations and artistic shapes.
Opt for tiny floral accents if you prefer soft decorative details and romantic beauty aesthetics.
No single style is universally better than the others.
The right choice depends on your personal preferences, the nail shape you wear, and how much time you want to spend creating the design.
Essential Tools for Creating Easy Nail Art at Home
Building a beginner-friendly nail art collection does not require purchasing every specialized beauty tool available.
A few carefully selected items can support many different minimalist designs.
A quality base coat helps prepare the nails for polish application, while a glossy top coat improves the finished appearance and helps protect the decorative layers.
A small dotting tool is particularly useful because it can create metallic accents, flower petals, and many simple geometric patterns.
A fine liner brush offers greater control when drawing curved lines or delicate decorative details.
Neutral nail polish is also worth prioritizing.
Sheer pink, milky beige, and soft nude shades provide versatile foundations for a wide range of designs.
Once you have mastered these basic colors and tools, you can gradually introduce additional pastel shades or metallic accents.
There is no need to invest in an extensive collection immediately.
For traditional polish, choose products intended for natural nails and follow their drying instructions. Gel systems require suitable curing equipment and careful application to avoid uncured product touching the skin.
The goal is to make nail art enjoyable and manageable rather than expensive or unnecessarily complicated.
How to Make Simple Nail Art Designs Look More Professional
Even the easiest designs benefit from careful preparation and attention to detail.
The first step is creating a consistent nail shape.
Whether you prefer oval, almond, or square nails, evenly shaped fingertips provide a more cohesive foundation.
Next, pay attention to the condition of the nail surface.
Apply polish to clean, dry nails and avoid flooding the cuticle area.
Thin layers generally create a smoother appearance than one heavy coat.
Decorative placement should also be intentional.
A tiny accent positioned carefully can look more sophisticated than an elaborate design applied without balance.
Try to maintain consistent spacing and similar decorative proportions.
At the same time, do not worry about making every nail perfectly identical.
Small variations in swirl direction or accent placement can create an attractive handcrafted character.
Finally, apply top coat carefully once the decorative polish is adequately dry.
A smooth finish helps unify the layers and enhances the overall appearance.
Important Note: Simple nail art should never come at the expense of healthy nails. Avoid aggressive filing, cutting living cuticle tissue, or peeling off polish. Keep nail products away from irritated skin, follow product instructions, and discontinue use if you experience itching, redness, swelling, or other signs of irritation.
How to Choose the Perfect Neutral Base Color
Neutral polish is often the foundation of beautiful minimalist nail art.
However, not every nude shade produces the same appearance.
Warm beige colors create an inviting, understated effect and pair beautifully with gold accents.
Cooler pink-based nudes offer a delicate appearance that complements pastel swirls.
Milky white can create a clean, airy foundation for botanical details, although it may be less distinctive when paired with pale ivory petals.
Sheer rose tones provide a balanced combination of natural elegance and subtle color.
When choosing your base shade, consider the contrast between the background and decorative elements.
If the colors are too similar, the nail art may be difficult to see.
If the contrast is too strong, the design may lose some of its understated quality.
The goal is to find a combination that makes the decorations visible while preserving a soft overall appearance.
Experiment with small polish samples before applying the full manicure.
This simple step can help you discover which colors work best together.
Can Simple Nail Art Designs Work on Short Nails
Absolutely. Short nails are among the most practical and attractive canvases for minimalist nail art.
While elaborate decorative patterns may require additional space, simple accents can be adapted easily to smaller nail surfaces.
Gold dots are especially suitable because they occupy very little room.
A single metallic detail near the base of a short nail can provide a beautiful finishing touch.
Pastel swirls can also work well when the lines remain thin and the pattern is not overly complicated.
For floral nails, one miniature blossom often creates the most balanced result.
Short nails also offer practical advantages for everyday routines.
They are easier to maintain for many people and can feel more comfortable during typing, household tasks, and other daily activities.
For inspiration that specifically emphasizes short manicures, explore Short November Nail Ideas, while keeping in mind that seasonal designs have a different focus from evergreen minimalist nail art.
The important principle is adapting the scale of the decoration to the available nail space.
How to Keep Your Minimalist Manicure Looking Beautiful Longer
The longevity of a manicure depends on nail preparation, polish formulation, application technique, and everyday activities.
Start with properly cleaned nails and use a compatible base coat.
Avoid applying excessive amounts of polish because thick layers can take longer to dry and may be more vulnerable to imperfections.
Allow sufficient drying time between layers.
When applying decorative details, keep the artwork thin and controlled.
Thick dots or heavily layered swirls may create uneven surfaces.
Once the design has dried, apply a suitable top coat and follow the product’s recommended maintenance instructions.
Wear protective gloves when handling household cleaning products or spending extended periods in water.
Avoid using your fingernails as tools for opening packaging or scraping hard surfaces.
Regularly moisturizing the surrounding skin with hand cream or cuticle oil can also help maintain a neat, cared-for appearance.
A simple manicure often looks best when the surrounding hands and nails appear healthy and well maintained.
Frequently Asked Questions About Simple Nail Art Designs
What Is the Easiest Nail Art Design for Beginners
Minimalist dot nail art is one of the easiest starting points because it requires only a small dotting tool and one decorative polish color.
You can create a beautiful manicure by placing a single tiny dot on each accent nail.
Can I Create Nail Art Without Professional Tools
Yes. Some simple designs can be created using basic manicure supplies and carefully selected household substitutes, provided they are clean, smooth, and safe for use around nails.
However, inexpensive dedicated dotting tools and liner brushes usually provide better control.
What Nail Colors Look the Most Elegant
Sheer pink, warm beige, milky nude, muted taupe, and soft rose are excellent choices for understated manicures.
Their versatility makes them ideal foundations for minimalist decorative details.
Are Simple Nail Art Designs Suitable for Every Season
Yes. Minimalist nail art is generally evergreen because it does not depend on a specific holiday or seasonal motif.
You can adapt the same designs throughout the year by changing the base colors or decorative accents.
How Can I Make Simple Nail Designs Look Expensive
Focus on neat nail shaping, balanced decoration, harmonious colors, thin polish layers, and a smooth finish.
Avoid overcrowding the nails with too many competing details.
Should Every Nail Have the Same Design
Not necessarily.
Many sophisticated manicures combine undecorated nails with one or two carefully chosen accent nails.
This creates visual balance and allows the decorative details to become more noticeable.
Are Minimalist Nails Better With a Glossy or Matte Finish
Both finishes can look attractive.
Glossy top coats create a polished, luminous effect that works particularly well with metallic dots and pastel swirls.
Matte finishes offer a softer contemporary appearance, especially when paired with neutral or muted colors.
The choice depends on the aesthetic you want to achieve.
Final Thoughts on the Best Simple Nail Art Designs
Beautiful nails do not have to be complicated.
The most memorable Simple Nail Art Designs often use only a few thoughtfully placed details, soft colors, and an elegant sense of balance.
Minimalist gold dot accents offer timeless luxury with almost effortless application. Delicate pastel swirl lines introduce modern creativity while maintaining a soft, sophisticated appearance. Tiny floral accents add romantic charm through miniature details that are surprisingly easy to create.
Each design demonstrates how uncomplicated techniques can produce polished and attractive results.
Whether you are creating your first DIY manicure or searching for fresh inspiration beyond traditional single-color nails, these three styles provide an excellent starting point.
Experiment with your favorite neutral shades, adapt the patterns to your nail length, and allow small decorative details to express your personal style.
Because sometimes, the simplest manicure is the one that makes the most beautiful impression.